Using JavaScript with a HTML document
Getting started with some simple web programming
Let’s start with a relatively simple application that will introduce some of the important basics used in making a web page’s content more user interactive. JavaScript is a programming language that runs in a web browser and is the only language that can directly modify HTML content and elements while the page is running. There were many web pages that have only static content. But, modern web pages are more dynamic and JavaScript is what is used to provide much of the dynamics used to enhance user interaction. More and more, businesses and organizations are making use of web content and so it is a good idea to know how to create at least simple web pages. If you are interested in programming, using JavaScript to enhance a web page is a very practical skill.
I taught programming courses for a couple of decades and one of the biggest hurdles students struggle with is being able to get visual feedback while running/testing their programs. This is why I see JavaScript as a good programming language to learn for beginning programmers, as the web browser provides good visual feedback. You can see the results with relatively few lines of code. So, if you are new to programming, I think that learning JavaScript programming is a good way to go. On top of that, it is a quite useful skill, so you are learning programming that has a practical purpose.
Starting using StackBlitz
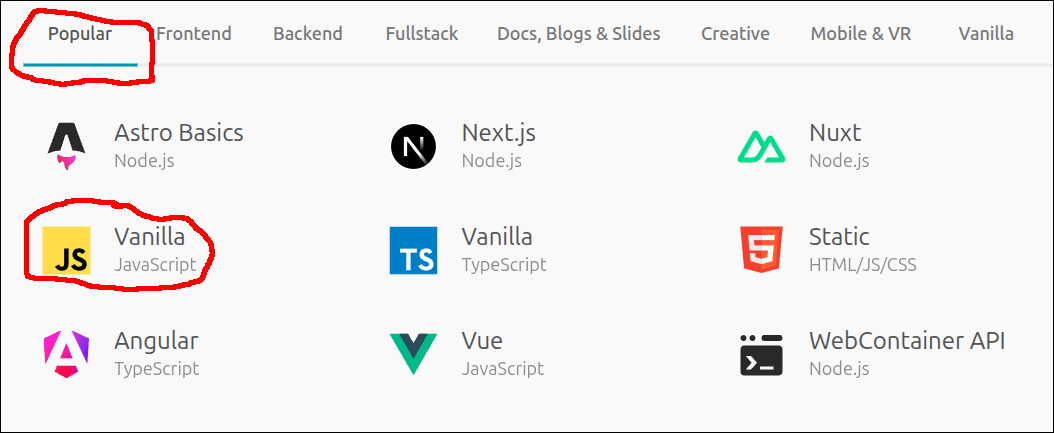
Login to your StackBlitz account. Click on the New project button. When the templates show up, click on the Popular templates and select the JS Vanilla template. This is a relatively simple template that provides the ability to make use of Node.js packages.
Here is what you will see next.
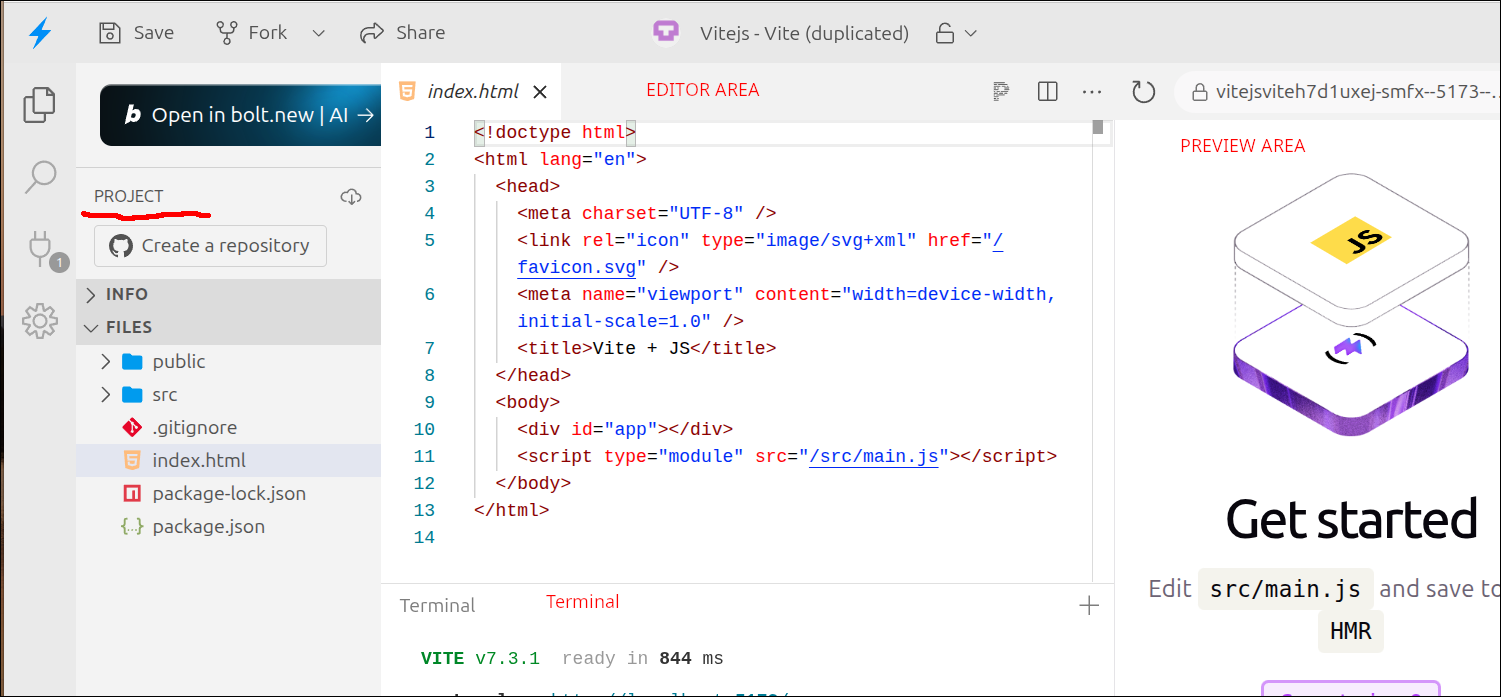
As you can see, there are three panels on the top, and a Terminal section below the center panel on the top. The left panel on the top is the PROJECT area, which is similar to the EXPLORER section in the Visual Studio Code (VS Code) editor. The center panel on the top is the EDITOR area, which is where you edit your files. The right panel on the top is the PREVIEW area where the web page will be displayed.
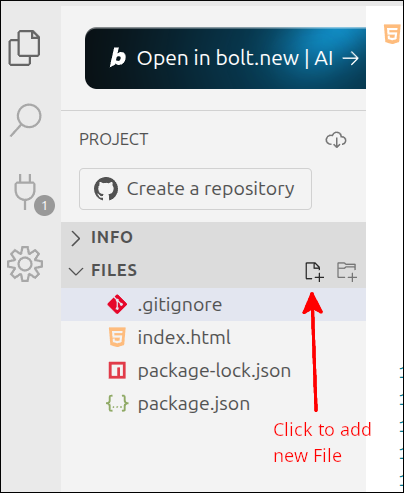
In the PROJECT area, we are going to make a number of changes. Right-click on and delete the public folder and the src folder. We won’t need them for this lesson. Then, hover the mouse over the PROJECT files until you see the buttons for adding a new file and adding a new folder show up. Click on the button to add a New file
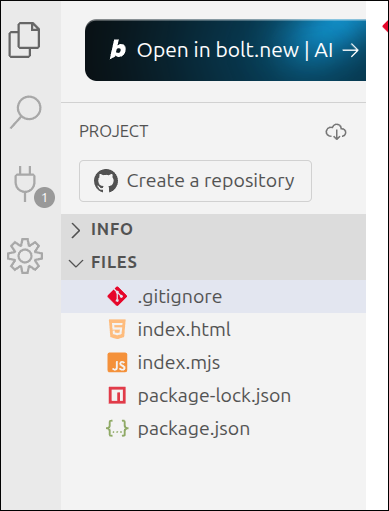
Add a file named index.mjs. Your PROJECT panel should look like this now:
Starting with a local development system using Vite
If you are running Linux, Windows 11 or Mac OS, instead of StackBlitz, you can start by opening a terminal and running the following commands:
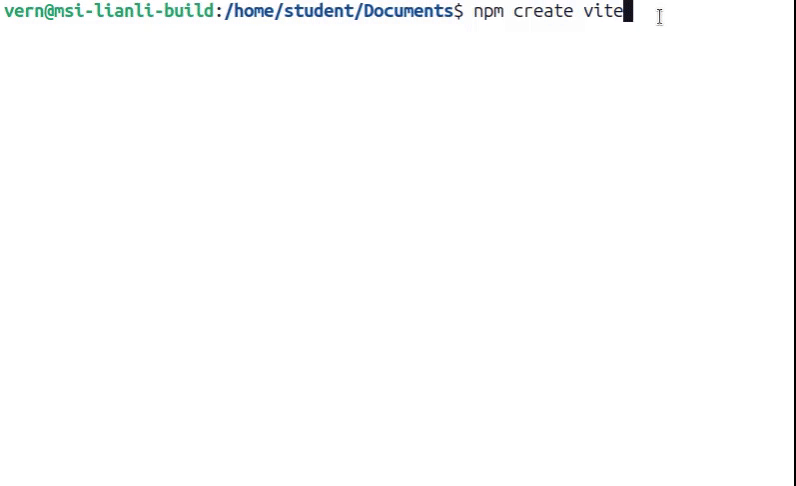
$ cd ~/Documents
$ npm create vite
The second command will create a Vite project. This is an interactive command and we will use this to create our project. The following animated gif file will demonstrate this.
Click on Reload gif to replay animation.
This will result in the following output to the console:
$ npm create vite

> npx
> create-vite

│
◇  Project name:
│  simple_html_javascript
│
◇  Select a framework:
│  Vanilla
│
◇  Select a variant:
│  JavaScript
│
◇  Use rolldown-vite (Experimental)?:
│  No
│
◇  Install with npm and start now?
│  No
│
◇  Scaffolding project in /home/student/Documents/simple_html_javascript...
│
└  Done. Now run:

  cd simple_html_javascript
  npm install
  npm run dev
We will do the first two instructions on the bottom on lines 26 and 27.
That is we will run the following:
$ cd ~/Documents/
$ cd simple_html_javascript
$ npm install
Our project directory will be ~/Documents/simple_html_javascript. Running npm install in that directory will install the required Node.js packages in a folder called node_modules.
Start up VS Code and open up the folder ~/Documents/simple_html_javascript. That will look like this:
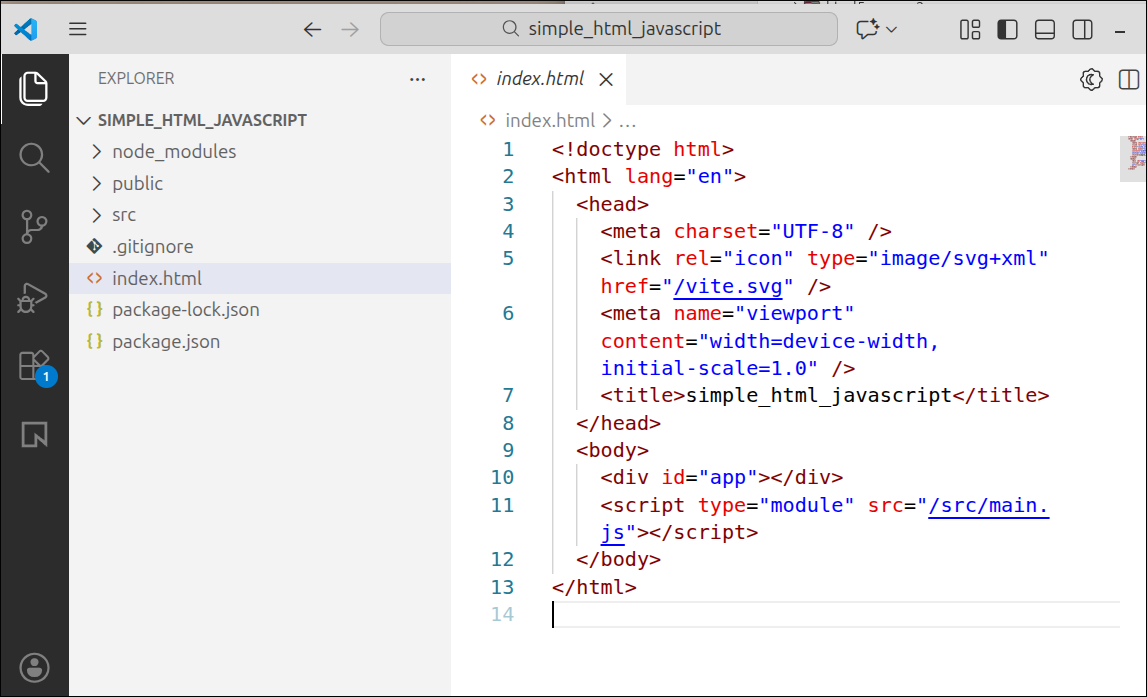
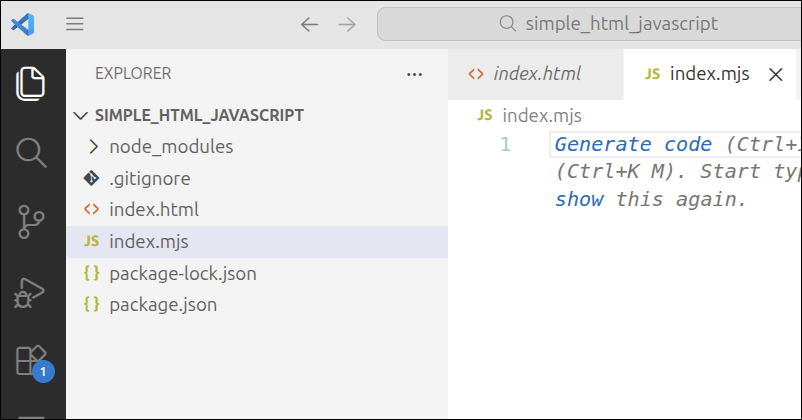
You can right-click with the mouse on the public and src folders to delete them. Then, right-click in the area below the files listed and select New File. Name this file index.mjs. This is what your EXPLORER section should look like now:
This is basically equivalent to what you would have had if you had used StackBlitz.
Replacing the source code
We are going to replace the source code for index.html and index.mjs. I will show you the source code that you want to wind up with. If you are new to programming, you can just copy and paste the code to replace the source code that already exists. This is a good way to start, and it is more important to understand some of the important details about the source code, than it is to be able to type all of it out at this point. However, as you progress, you do want to get into the habit of typing out as much of the source code as you feel comfortable with. If you make some mistakes, you can always look at the source code I put up to make corrections. If you can’t figure out what went wrong, you can always fall back to copying and pasting the code.
Let’s talk first about the index.html file. This is a HTML (Hypertext Markup Language) file. HTML (Hypertext Markup Language) is a text-based language that gives structure to a web page and controls how things are displayed on that web page. When we are talking about web pages, the markup refers to the HTML used for that page. HTML is not a programming language. Instead, HTML contains the markup used by a browser to properly process the contents of the page for display. So, while HTML code is not a program, it is used by a program (the browser) to control what the page looks like.
So, the file index.html contains the markup for the web page.
The index.mjs file is a JavaScript file. JavaScript is the only programming language that can directly manipulate the contents of a web page. Since many things are web-based, you can easily see why JavaScript is an important language.
The extension .mjs is used for JavaScript files that conform to the ECMAScript Modules specification. Sometimes you will also see this referred to as ES Modules. You will see many JavaScript files that have the .js extension. That extension is often used to differentiate them from the .mjs files, because the .js files are often using the older CommonJS modules. The ECMAScript Modules specification is preferred and recommended by most JavaScript programmers who work with Node.js (a server-side form of JavaScript). Nevertheless, you will see some programmers using the .js extension even when they are using ECMAScript Modules. But, the .mjs extension is used to declare that the more modern ECMAScript Modules specification is used. For these lessons, we will use .mjs files, as this is the more modern approach. However, you will definitely encounter JavaScript code that forces you to use the older CommonJS modules specification.
We will go over a comparison of the ES Module format vs the CommonJS format in some later lessons. For now, just remember that index.mjs is the file with the JavaScript code.
Modifying index.html (the markup)
The first thing we will do is modify the index.html file. The file from the template is a reasonable start, but we want to make a few changes. Here is the new version of index.html
<!DOCTYPE html>
<html>
  <head>
    <title>Simple HTML with JavaScript</title>
    <meta charset="UTF-8" />
    <script src="./index.mjs" type="module"></script>
  </head>
  <body>
    <h1>Simple HTML with JavaScript</h1>
  </body>
</html>
Let’s go over these lines. Line 1 is a declaration that tells the web browser to use the HTML5 specification. This is the most recent version of HTML. HTML5 added several new features that are important for making web pages that can be made dynamic using JavaScript, so this is an important declaration. Lines 2-11 define the <html> element. This element encloses everything that goes on to the webpage. The <html> element begins on line 2 and ends with the end tag on line 11. Note that these tag names are predefined. You cannot just use any names you want. Here is a few notes about start tags and end tags in HTML.
Not all HTML elements have start and end tags, but most of them do. All of the container-like elements have a start tag and an end tag. The container element that is used to enclose the entire HTML document is the <html> element:
<html>

</html>
Note that the end tag name always starts with the / character.
Here is another container-like HTML element, the <div> element.
<div id="nav">

</div>
Note that this <div> element’s start tag has an attribute. In this case it is the id="nav" attribute. An id attribute is used to help identify an element, and this is made use of quite regularly in JavaScript programming. Attributes can only be used with the start tag. End tags don’t have attributes. This makes sense as attributes commonly are used to specify the layout of the contents of a container-like HTML element. So, the web browser needs to see those attributes at the beginning of the element to display that element correctly.
Lines 3-7 define the <head> element. This is where you put things like the <title> element on line 4, and <meta> tags like the one on line 5 that specify the character set to use for the text on the web page. The <title> element sets the text that shows up in the tab for the web page. If you look at the following screen shot, I have several tabs open:
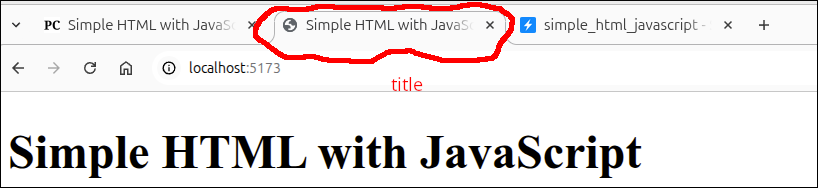
The first tab is for a web page that has the title "Simple HTML with JavaScript". The second tab is for the page that is being displayed by the Vite server. It just so happens that this is the same title as for the first tab. The third tab shows "simple_html_javascript", but that is because that is the StackBlitz page, and StackBlitz puts the title of the project in the tab. The first two tabs show you the <title> element is used by web browsers.
Using the <meta> tag that specifies the UTF-8 characters set specifies this character set to display the text. This can handle characters for just about any valid writing system, and this prevents the injection of harmful data that an attacker might use.
Line 6 is a <script> element. This is typically where you would place the JavaScript for the web page. Although you can place <script> elements inside the <body> element, we will stick to putting our <script> elements up in the <head> element. That way, you will know to look at the <head> section for any <script> elements for our lessons. Line 6 will include the code from the file index.mjs to be used by this page. Note that the src attribute is set to ./index.mjs. The ./ is a way to specify that the file is in the same directory as the file that is doing the including. This type of notation is very important, because you will eventually run into cases where you have files that are not all in the same directory (folder). When you use a JavaScript file with the .mjs extension, you must specify the type attribute for the <script> as being module. This will force the browser to treat that JavaSript file as using the ECMAScript Modules (ES Modules) specification.
Line 6 is another example of a HTML element that uses attributes in the start tag. These attributes are properties that modify the usage of that element. In this particular case, the src attribute specifies the file to be included, and the type attribute (being module) specifies that the script is using the ES Modules format. Remember that attributes are only used in the start tag. That is, end tags don’t contain attributes.
Lines 8-10 define the <body> element. This is where all the HTML markup for the part of the page that is displayed in the main window of the browser. I try to keep the <body> element free of any JavaScript code. Line 9 uses a <h1> (Heading1) element. The <h1> element is a title that uses the largest size by default. Technically, there should only be one <h1> element in a document. Other headings would include <h2>, <h3>, <h4>, <h5> and <h6>. As the number gets larger, the smaller the default size of the heading. A heading element will have a blank line above and below it when displayed in the browser. Many search engines make use of the heading elements to form a kind of outline of the page. This is used to help identify the content of that page. So, when making HTML files, it is a good idea to think of the heading elements as though they are a title <h1>, subtitles <h2>, subsubtitles <h3>, etc.
Modifying index.mjs (the JavaScript code)
As you have probably noticed, the Preview is showing an error. This is because we need to modify index.mjs. In the Explorer, click on the file index.mjs to begin editing it. Here is the new version of index.mjs:
if (document.readyState === "loading") {
  document.addEventListener("DOMContentLoaded", init);
} else {
  init();
}

function init() {
  console.log("init called");
}
Lines 1-5 define what is called a selection statement in programming. Although this looks like a number of lines, those lines represent a single selection statement. A selection statement allows the program to select only certain lines of code to be run, depending on the value of a test condition. This is why selection statements are commonly referred to as conditional statements. This particular selection statement is what is called an if statement.
One of the most important things that a JavaScript programmer must get used to, is that the JavaScript code must not start executing until the page is rendered by the browser. The reason for this, is that JavaScript is often used to manipulate some HTML elements on the page. To perform this manipulation, the JavaScript code needs to have a way of specifying exactly which element is being affected. This means two things. First, that element must have already been rendered, and second, the element must have something that makes that element selectable.
Getting back to our code, this particular if statement represents two cases. The first case starts on line 1 and ends on line 3. This first case is executed if the test condition (document.readyState === "loading") is true. In terms of what is physically happening, this case will be true if the HTML elements in the body are still being rendered. The second case is the else clause that starts on line 3 and ends on line 5. An else clause can only exist as part of an if statement. That is why the else is referred to as a clause not a statement. If you understand how else works, you will see why this has to be the case. The else case matches anything that is not previously matched. So, if the first case (document.readyState === "loading") is not true, then the else case is executed.
Let’s dig into more of the details. If the document is still being rendered (still loading), then line 2 will be executed. Line 2 adds something called an Event Listener that specifies that a function be called when that event being listened for occurs. In this case, the event that is being listened for the DOMContentLoaded event. That event occurs when the HTML elements in the <body> are completely rendered. When that event occurs, the init() function is called. In any programming language, you need to set a start point for the program to start running. A common way to do this in JavaScript programming, is to make a function called init() that provides that start point.
On the other hand, if the document is already rendered (the else case), then the init() function is called. So, in either case the init() function is called. By making init() the function that is called when the DOMContentLoaded even occurs, this if statement ensures that init() will be called after the page is fully rendered, and that init() marks the starting point of the JavaScript execution.
Lines 7-9 define the init() function. In this case, there is only one line of instruction and that is line 8. The console.log() function will print the argument (whatever is in the parentheses) to the console. In JavaScript the console is a place where you can send output. If this where a program running in a real browser, the console is displayed as part of the Dev Tools. You would have to hit F12 or right-click on the window and select Inspect to bring up the Dev Tools.
After saving this version of index.mjs, this is what you should see inside of StackBlitz:
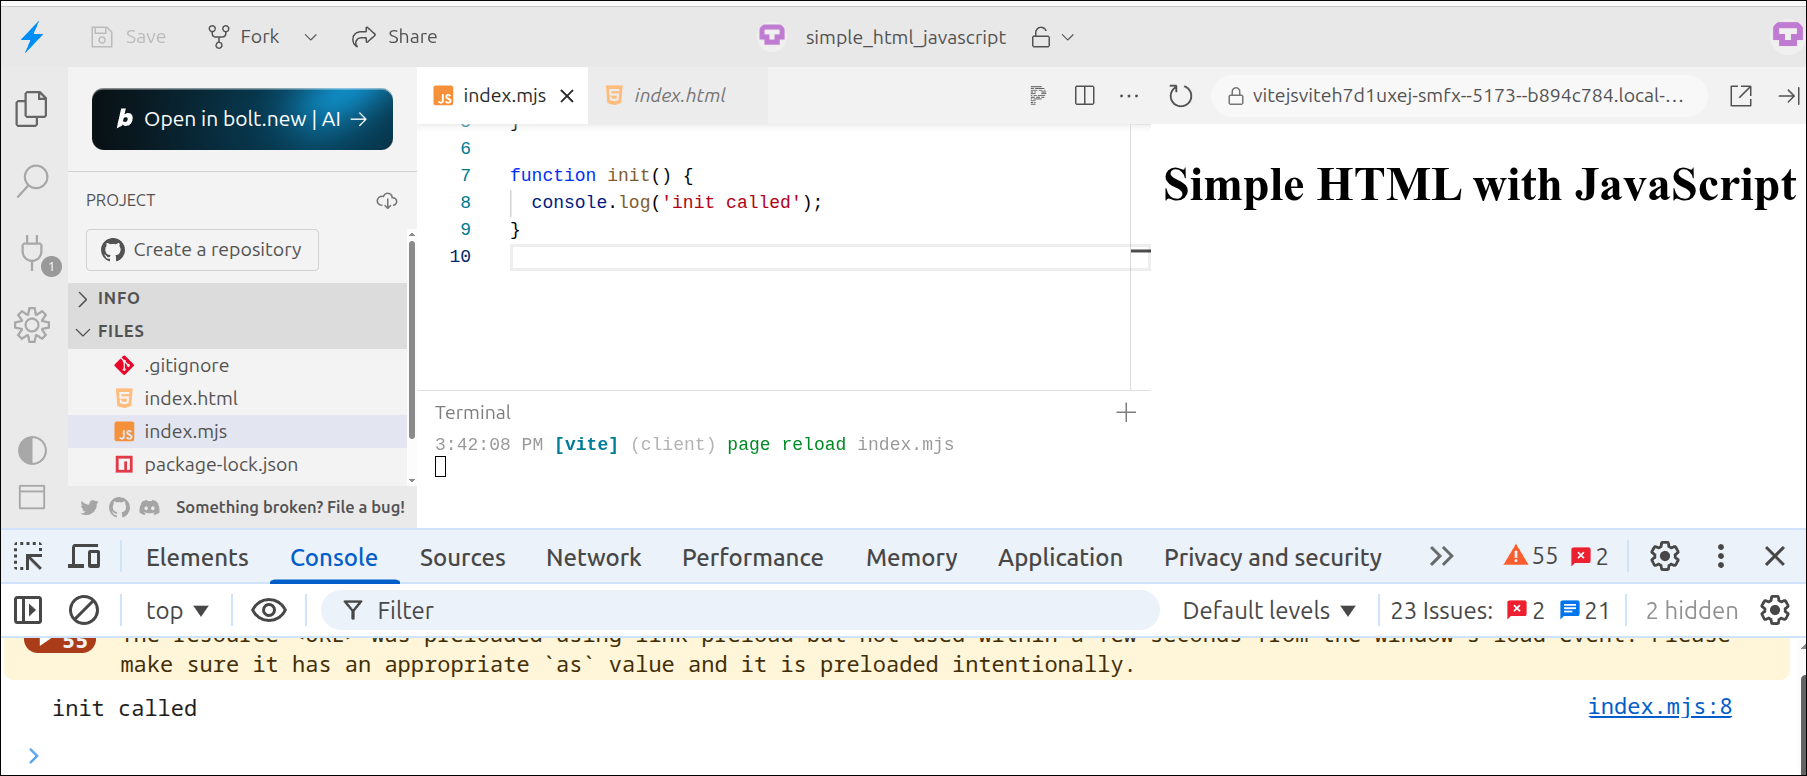
As you can see, the message output from the console.log() function is displayed in the console. Inside of StackBlitz, the console takes up the space on the bottom of the browser window.
If you are just using Vite locally, follow the following to see the program running:
$ cd ~/Documents/simple_html_javascript
$ npm run dev
Then, if you open your web browser to localhost:5173, you should see this after opening DevTools using F12 or right-clicking and selecting Inspect.
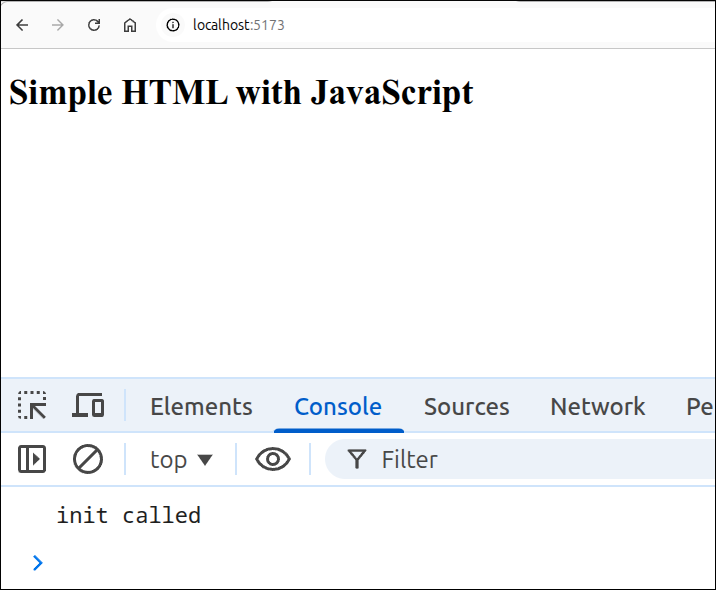
The larger size is exaggerated by the way I created the screen shot, but the idea is that since you are only displaying the web page (not the list of files or editing area), you can see more easily what is going on. If you want to see a view like this one using StackBlitz, you can click on the Open preview in new tab button on the top bar of the preview area.
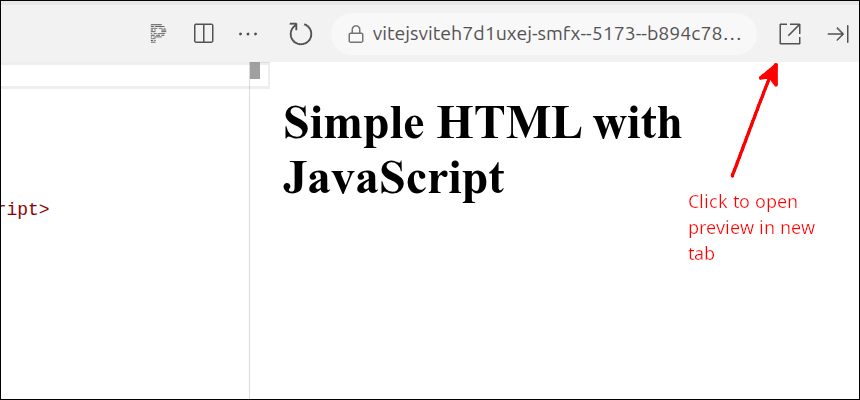
This should show a message saying you are almost there and the click on a button to connect to Project. Then, the external tab should display correctly:
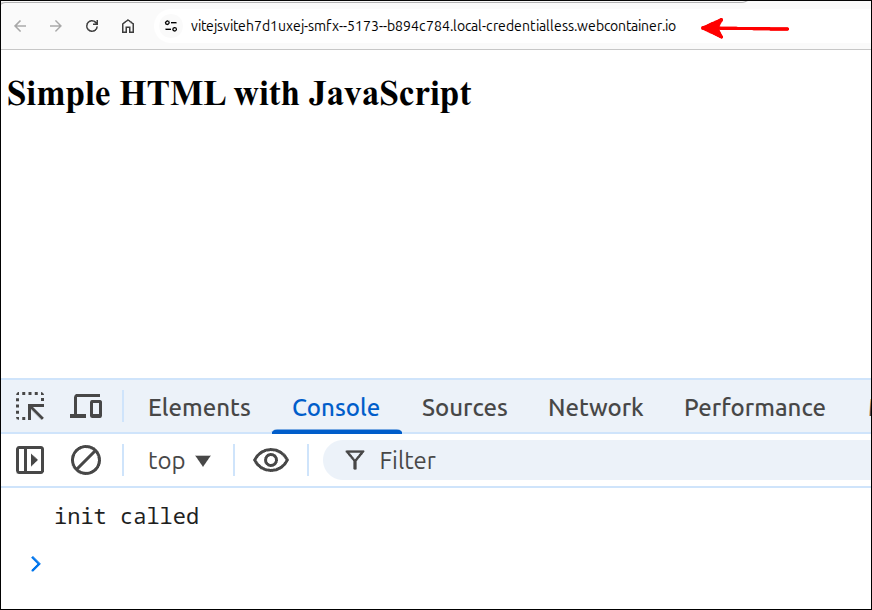
Note the different address from what I showed for the screen shot if running locally.
Using <input> elements
Let’s add some <input> elements into our markup. One of the ways you can make your program interact with the user, is to use input from the user to modify what is displayed by your program. The HTML <input> element is one of the best simple ways to gather user input. The <input> element has many possible types of which several are commonly used.
Text boxes
For this lesson, let’s use text boxes as they are one of the common ways of using <input> elements. This means using elements that look like this:
<input type="text" id="namebox">
There are other attributes that can be used with text boxes (such as size), but this is good minimum way to set a text box up. That is, you give it a type="text" attribute and an id attribute. You choose the value of the id attribute in a way that helps remind you what that text box is being used for.
Let’s add some text boxes to our markup. Here is the new version of index.html:
<!DOCTYPE html>
<html>
  <head>
    <title>Simple HTML with JavaScript</title>
    <meta charset="UTF-8" />
    <script src="./index.mjs" type="module"></script>
  </head>
  <body>
    <h1>Simple HTML with JavaScript</h1>
    num1:
    <input type="text" id="num1box" size="7" />
    num2:
    <input type="text" id="num2box" size="7" />
    <button id="add_button">Add</button>
    <br /><br />
    Result:
    <input type="text" id="resultbox" size="8" /"
  </body>
</html>
The new lines are 10-17. Line 10 is text that serves as a prompt for the next input box. Line 11 creates an input text box with an id="num1box" attribute. The size attribute is used here to shrink the default size of the text box so that it does not take up too much space. Line 12 is the prompt for the next input box. Line 13 creates an input text box with an id="num2box" attribute that also has a size of 7. Line 14 creates a <button> element that has an id="add_button" attribute. The text in between the start tag and the end tag of the <button> element will be the text displayed on the button. Line 15 puts in a couple of <br /> (break) elements that forces the output to go to the next line. This will leave a blank line before the next element. Line 16 is a label for the last text box. Line 17 creates an input box where the result will be displayed. After entering these lines in, you can see in the Preview what this looks like. In addition to the preview of the body, look at the Elements tab being displayed below.
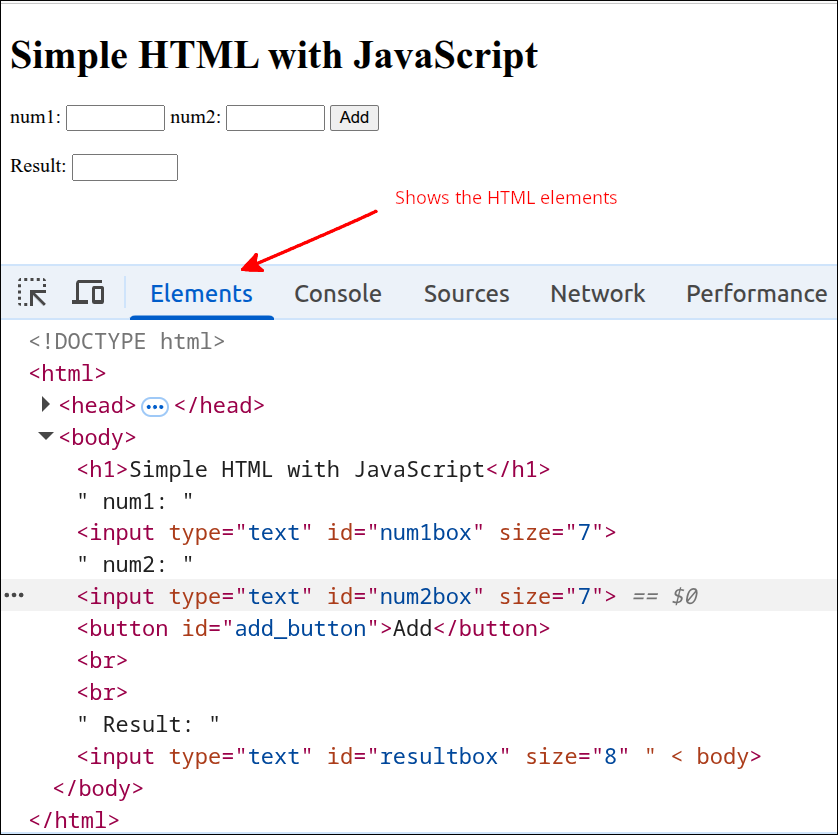
So, as you can see, besides the Console, the Elements tab is also useful. By glancing at the Elements we can see the names of the id attributes. That will be useful when we modify the JavaScript code.
Modifying index.mjs (the code)
Let’s start to modify index.mjs. We will do this in small increments to try to make it easier to grasp the important points. We’ll start by making it so that we can respond to the user clicking on the Add button. Here is the new version of index.mjs:
if (document.readyState === "loading") {
document.addEventListener("DOMContentLoaded", init);
} else {
init();
}
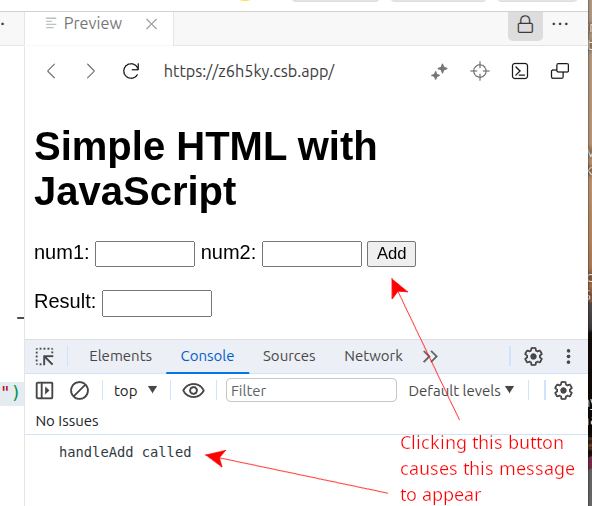
function handleAdd() {
console.log("handleAdd called");
}
function init() {
const add_button = document.getElementById("add_button");
add_button.addEventListener("click", handleAdd);
}The new lines are 7-9 and 12-13. Line 12 gets a reference to the add button. This is needed so that on line 13 we can assign the handleAdd() function to be the function that is called when the add button is clicked. So, on line 13, the event that we are responding to is the 'click' event that occurs when a user clicks on that button. The second argument to the addEventListener() function is the name of the function that is called when that event occurs. This is a very important set of lines to understand, as this is one of the key ways that JavaScript can make a web page dynamic.
Lines 7-9 define the handleAdd() function. At this point, all this function does is print to the console 'handleAdd called'. This will be our way of testing that the event handling is working so far.
The following partial screen shot shows the Preview screen displaying the Console:
Incremental Development
Note that we only added a few lines of code before testing to see if what we added works correctly. The method of adding only enough code so that you can test, testing, and then continuing if the code works, is called Incremental Development. This is probably the most important programming technique there is. This applies to every programming language and practically every programming project.
Reading and processing the input
What we are trying to do here is gather the user input for num1 and num2 and then add those numbers together. Then, we want to display the result in the result text box. This means we need to modify the handleAdd() function in index.mjs. Here is the modified version:
if (document.readyState === "loading") {
document.addEventListener("DOMContentLoaded", init);
} else {
init();
}
function handleAdd() {
const num1box = document.getElementById("num1box");
const num2box = document.getElementById("num2box");
const num1text = num1box.value;
const num1 = Number(num1text);
const num2 = Number(num2box.value);
const result = num1 + num2;
const resultbox = document.getElementById("resultbox");
resultbox.value = result;
}
function init() {
const add_button = document.getElementById("add_button");
add_button.addEventListener("click", handleAdd);
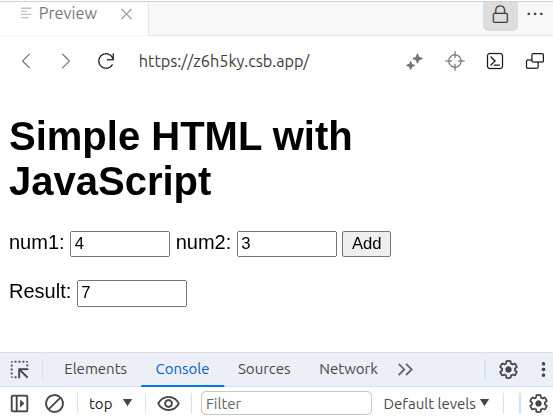
}The new lines are 8-15. Line 8 gets a reference to the text box for num1. Line 9 does the same thing for the text box for num2. Line 10 gets the user input inside of the text box for num1. Line 11 uses the Number() function to convert that user input (which is text, not a number) into a number. Line 12 does what is done on line 10 and line 11 for the text box for num2. Normally, I would combine line 10 and line 11 into one instruction just as on line 12. But, we do this here only to emphasize the that value of a text box is always a string (text), not a number. So, if you need for that value to be treated as a number, you must convert it using the Number() function.
Line 13 adds the two numbers and stores this in the constant result. Line 14 gets a reference to the result text box, so that on line 15 we can place the result into that text box.
The next partial screen shot shows the result of inputting in some numbers and pressing the Add button:
What does const mean?
If you have done any programming before, you may know something about variables. We use variables to store data, to make it easier to manipulate that data. In JavaScript, we declare variables using either the keyword const or the keyword let. We use const when the value being referred to does not need to be changed within the scope of that const. So, you can think of the declaration const being used for things that don’t have to be changed within the scope of those things. The scope of a const or a let is the curly braces ({ }) within the const or let is defined. Here is the code for our handleAdd() function from index.mjs:
function handleAdd() {
  const num1box = document.getElementById("num1box");
  const num2box = document.getElementById("num2box");
  const num1text = num1box.value;
  const num1 = Number(num1text);
  const num2 = Number(num2box.value);
  const result = num1 + num2;
  const resultbox = document.getElementById("resultbox");
  resultbox.value = result;
}
Everything here is declared as const. That is because the values that they point to don’t change within this function. Since they are all declared within the handleAdd() function, that is the scope of those const references. This can get a little tricky because you can declare a reference to an object as const. The values within that object can change, but the reference to the object being declared this way does not change.
If you know something is going to change, then you should declare it as let. You could define everything as let and not use const, but this is not considered best practice. This is because a reference to an object should not change, and so should be declared as const. Think of how a problem might arise if you have two different variables referring to the same object. This can lead to difficulties in understanding the code and maintaining it. So, any reference to an object, should be declared as const.
Summary
-
We kept our JavaScript code in the file index.mjs and our HTML markup in the file index.html. So, we kept the markup separate from the JavaScript code. This is a good practice in general. But, be aware that many examples online will show these combined into just one HTML file.
-
We learned about Incremental Development and used it to develop our code in small pieces that could be tested before going on to add more code.
-
We saw that for JavaScript code to interact with a HTML element, that element should have a unique id attribute.
-
We used the element.
addEventListener()function to associate a function that will be called when that event occurs. So far, the two events that we have dealt with are the DOMContentLoaded event (that occurs when the page has been loaded) and the click event that occurs when an element has been clicked on . -
We learned to use the Console area in the Preview to see the output from console.log() statements. Also, we learned how we can use console.log() to test our code as we develop increments of the code.
-
We learned that <input type="text"> elements will have a value that is a string (text), so it must be converted into a number using the
Number()function.